MacOS Sequoia 15 Slow / Lagging? How to fix it

Is your Mac lagging or freezing while running macOS 15 Sequoia? Have you noticed it slowing down or behaving inconsistently since updating? Today, we’ll look into the latest version of macOS—macOS 15 Sequoia—and explore why it might be slowing down your system. While Sequoia brings several performance and security improvements, many users have reported issues with speed and responsiveness after installing it. Some of the most anticipated features—like enhanced AI tools, better multitasking, and tighter ecosystem integration—require significant system resources. That means not all Macs will handle the update equally well.
One of the first things to check is whether your Mac model is fully compatible with macOS Sequoia. If your device is older or near the cutoff for supported models, it might struggle to keep up with the demands of the new OS. In that case, disabling some of the newer features could help improve performance. However, if your Mac is supported and you’re still facing slowdowns, don’t worry—there are several steps you can take to troubleshoot and speed things up. In this guide, we’ll walk through the common causes of lag in macOS 15 Sequoia and provide practical solutions to restore smooth performance.

Top 15 Common macOS 15 Sequoia Issues and Their Solutions

1. System Slowdowns Post-Update

Symptoms: Lagging performance, delayed application launches, and unresponsive system behavior.

Solution:

  • Restart Your Mac: A simple restart can clear temporary glitches.
  • Check Storage Space: Navigate to Apple Menu > System Settings > General > Storage to ensure sufficient free space.
  • Clear Cache Files: Use Finder to access ~/Library/Caches/ and delete unnecessary files.
  • Manage Startup Items: Go to System Settings > General > Login Items and disable unneeded startup applications.

2. Installation Failures

Symptoms: Installation process freezes or fails to complete.

Solution:

  • Stable Internet Connection: Ensure a reliable internet connection during the download and installation process.
  • Check Apple’s System Status: Verify that Apple’s servers are operational by visiting their System Status page.
  • Safe Mode Installation: Restart your Mac in Safe Mode and attempt the installation again.

3. Application Crashes

Symptoms: Frequent crashing of third-party applications post-update.

Solution:

  • Update Applications: Ensure all applications are updated to their latest versions compatible with macOS Sequoia.
  • Reinstall Problematic Apps: Uninstall and reinstall applications that continue to crash.
  • Contact Developers: Reach out to application developers for updates or patches addressing compatibility issues. Adobe Community

4. Network Connectivity Issues

Symptoms: Unstable Wi-Fi connections, slow internet speeds, or inability to connect to networks.

Solution:

  • Disable Ethernet: If using both Wi-Fi and Ethernet, unplug the Ethernet cable to improve stability.
  • Adjust Wi-Fi Settings: Turn off “Limit IP address tracking” in System Settings > Network > Wi-Fi > Details.
  • Reset Network Settings: Remove and re-add Wi-Fi networks to reset configurations.

5. Overheating Issues

Symptoms: Mac becomes unusually hot, fans run continuously, or system shuts down unexpectedly.

Solution:

  • Clean Internal Components: Remove dust from fans and vents to improve airflow.
  • Monitor CPU Usage: Use Activity Monitor to identify and close resource-intensive processes.
  • Use Cooling Pads: Employ external cooling solutions to maintain optimal temperatures.

6. Bluetooth and Peripheral Connectivity Problems

Symptoms: Inability to connect Bluetooth devices or peripherals not recognized.

Solution:

  • Reset Bluetooth Module: Hold Shift + Option and click the Bluetooth icon in the menu bar, then select “Reset the Bluetooth module.”
  • Remove and Re-pair Devices: Delete existing Bluetooth pairings and reconnect devices.
  • Update Device Firmware: Ensure peripheral devices have the latest firmware updates.

7. Security Prompt Fatigue

Symptoms: Frequent security pop-ups requesting permissions, leading to user frustration.

Solution:

  • Adjust Security Settings: Navigate to System Settings > Privacy & Security and modify app permissions to reduce prompts.
  • Provide Feedback to Apple: Use the Feedback Assistant to report excessive prompts and suggest improvements. Lifewire

8. Compatibility Issues with Security Software

Symptoms: Third-party security applications malfunction or cause system instability.

Solution:

  • Update Security Software: Ensure all security applications are updated to versions compatible with macOS Sequoia.
  • Contact Software Support: Reach out to the software providers for patches or guidance.
  • Use Built-in Security Features: Consider relying on macOS’s built-in security tools if third-party software remains incompatible.

9. Battery Drain Issues

Symptoms: Rapid battery depletion, even during minimal usage.

Solution:

  • Enable Low Power Mode: Go to System Settings > Battery and activate Low Power Mode.
  • Check Battery Health: In System Settings > Battery > Battery Health, assess the battery’s condition.
  • Manage Background Activities: Limit background app refresh and close unnecessary applications.

10. Display and Resolution Problems

Symptoms: Screen flickering, incorrect resolution settings, or external displays not recognized.

Solution:

  • Reset NVRAM/PRAM: Shut down your Mac, then turn it on and immediately press and hold Option + Command + P + R for about 20 seconds.
  • Check Display Settings: Navigate to System Settings > Displays to adjust resolution and arrangement.
  • Update Display Drivers: Ensure any external display drivers are up to date,

11. Time Machine Backup Failures

Symptoms: Inability to complete backups or Time Machine not recognizing backup disks.

Solution:

  • Re-select Backup Disk: In System Settings > Time Machine, remove and re-add the backup disk.
  • Check Disk Format: Ensure the backup disk is formatted correctly (APFS or Mac OS Extended).
  • Run Disk Utility: Use Disk Utility to verify and repair the backup disk.Apple Support Community

12. iCloud Syncing Issues

Symptoms: Files not syncing across devices, or iCloud Drive not updating.

Solution:

  • Sign Out and Back In: Log out of iCloud in System Settings > Apple ID, then sign back in.
  • Check iCloud Storage: Ensure you have sufficient iCloud storage space.
  • Enable iCloud Drive: Verify that iCloud Drive is turned on in System Settings > Apple ID > iCloud.

13. Keyboard and Input Lag

Symptoms: Delayed keyboard response or unresponsive input devices.

Solution:

  • Reset SMC: Shut down your Mac, unplug the power cord, wait 15 seconds, plug it back in, wait 5 seconds, then turn on your Mac.
  • Update Input Device Firmware: Check for firmware updates for your keyboard or input devices.
  • Test in Safe Mode: Restart your Mac in Safe Mode to determine if third-party software is causing the issue.

14. Frequent Kernel Panics

Symptoms: Unexpected system restarts accompanied by a kernel panic message.

Solution:

  • Check for Hardware Issues: Run Apple Diagnostics to identify potential hardware problems.
  • Update macOS: Ensure your system is running the latest version of macOS Sequoia.
  • Review Panic Logs: Use Console to examine panic logs and identify recurring issues.

15. Downgrade Challenges

Symptoms: Difficulty reverting to a previous macOS version after encountering issues with Sequoia.

Solution:

  • Create a Bootable Installer: Use another Mac to download the desired macOS version and create a bootable USB installer.
  • Erase and Reinstall: Boot from the installer, erase your disk using Disk Utility, and reinstall the previous macOS version.
  • Restore from Backup: Use Time Machine or other backup solutions to restore your data. Apple Support Community

By addressing these common issues with the provided solutions, you can enhance your macOS Sequoia experience and ensure your Mac operates smoothly. If problems persist, consider reaching out to Apple Support or visiting an Apple Authorized Service Provider for further assistance.

MACOS VENTURA WIFI NOT WORKING NO Internet

As you will probably already know there dozens of different reasons as to why your Wi-Fi speed could be delayed on Ventura OS. It can be down to your choice of browser, where your router might be located in your house or your distance away from the said router or maybe issues with how many programs you have open that are simultaneously using the internet. Here is some troubleshooting you can carry out.

The first port of call in this instance is to restart your router. Find out where your router is located in your office or home and simply switch it off using the reset button, leave it off for around 10 seconds before switching it back on. It will take approximately 5 minutes for the connection to come back up and look for any improvement.

Ventura

1. Fix Ventura os Slow Wifi or NO internet issue

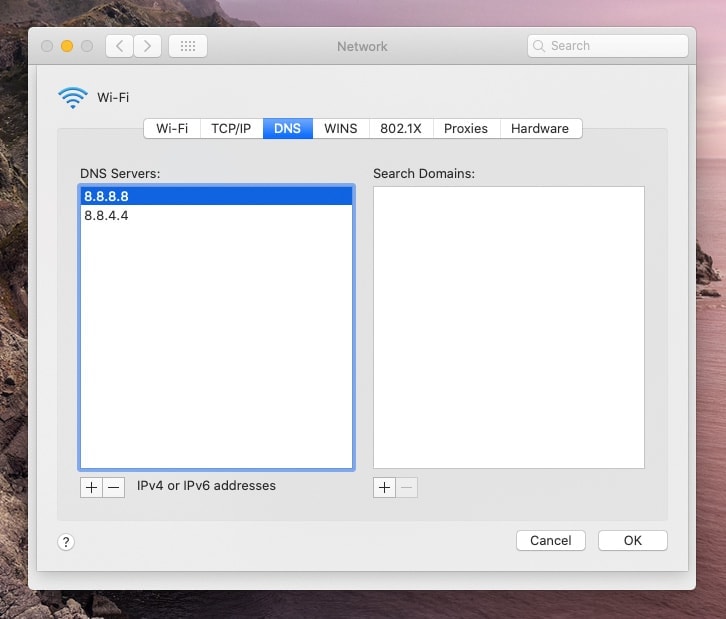
Next, you’ll want to check your DNS Settings. To do this:
1. Go to the Apple Menu in the top left of your screen.
2. Select “System Preferences” and Select “Network” and then to “Wi-Fi”.
3. Click “Advanced” button, in the next window select the DNS option.
4. Click the [+] button to add a new DNS network.
5. Type in the IP addresses of 8.8.8.8 and 8.8.4.4, respectively. This means that it will first look for googles servers, which will speed up your browsing experience as it is statistically the fastest DNS server.

2. Remove Network and ReConnect

If the problem persist your next step is to remove the WiFi network that you have issues with an reconnect to it later on:

  • Open System Settings -> Network.
  • Go to Advanced WiFi settings.
  • Click the WiFi network in question and remove it.
  • Click the WiFi icon in the menu bar and reconnect to the previously removed network. You should find it in the Other Networks section.

Bottom Line

Hopefully, this guide will have given you all the answers you could have wanted should you have found yourself feeling frustrated at your system running slow after updating to the latest macOS 13, namely Ventura. This guide has also run you through all the possible reasons and solutions should you be having these issues and once resolved, you should be able to use the Ventura OS at an optimal speed.

Fix Slow Wi-Fi Speed on Catalina OS 10.15

Are you facing slow internet speed or slow wifi speed after upgrading to Catalina os 10.15 then you can follow the below steps to fix slow wifi speed. As you will probably already know there are many different reasons for slow Wi-Fi speed.

It can be slow due to the slow internet browser or your router location where you are connected to your MacBook Pro or Air or maybe issues with how many programs you have open that are simultaneously using the internet. Here is some troubleshooting you try out.

How to fix slow wifi speed on Catalina os 10.15?

Firstly we will try to fix dns on Catalina os x to do this:


1. Go to the Apple Menu in the top left of your screen.
2. Select “System Preferences” and select “Network” and then to “Wi-Fi”.
3. Click “Advanced” button, in the next window select the DNS option.
4. Click the [+] button to add a new DNS network.
5. Type in the IP addresses of 8.8.8.8 and 8.8.4.4, respectively. This means that it will first look for Google’s servers, which will speed up your browsing experience as it is statistically the fastest DNS server.

Fix Your Startup Disk Full on Catalina OS!

What is a startup disk?

A startup disk, as taken from Apple Support article, is a volume or partition of a drive that contains a usable operating system. Still confused? Let’s break it down for you.

Your Mac hard drive consists of disks (or partitions). Each disk (or partition) has your Mac Catalina OS data on it, which consists of your operating system, applications, etc. Most Mac users have just one disk but power users may have two or more.

Let’s look at an example of a Mac Catalina OS with only one hard disk:

  • Your Mac’s hard drive is 500GB.
  • It has one “disk” on it, so all 500GB of storage is on that disk.
  • The disk has an operating system (OS X El Capitan), and user data (apps, etc). 
  • And since you only have one disk, this is your startup disk: all 500GB.

A Mac with two disks will have the storage divided between them. The Mac drive with the OS on it is the startup disk while the other drive is just used for storage of files. It’s possible to have multiple startup disks, but most Macs will only have one.

Why your disk is almost full on Catalina OS?

This is easy. It’s a lot like why is your fridge full? There is no more space! Your disk is almost full and this is very bad news for any drive. A hard disk should never get beyond 85% capacity (especially a startup disk) as you will experience slowness and errors the further you get above that mark.

If your startup disk is full and you get a message of warning from your Mac, this is a serious indication that you need to free up storage immediately.

What to do when your disk is almost full?

So how do you fix your almost full startup disk? The same way you solve the problem of a packed fridge – you need to clear up space, of course. To make more space on your startup disk you will need to:

  1. Delete files from your Mac.
  2. Move files to an external hard drive or cloud storage.
  3. Or install a second internal hard drive on your Mac.

So, now that we know what a startup disk is, we need to talk about how to fix it. Let’s take a closer look at your disk space to see exactly what is causing your disk to be almost full.

What’s Causing “Your Disk Is Almost Full” Alert on Catalina OS?

Short version: Take a look under-the-hood of your Mac.

Before we can see what is taking up space on your startup disk, first we have to find it:

  1. Hover on the Dock at the bottom of your screen and open Finder.
  2. Click on “Finder” in the menu bar at the top of your screen.
  3. Then select “Preferences…”
  4. In the window that opens, checkmark the “Hard disks” checkbox.

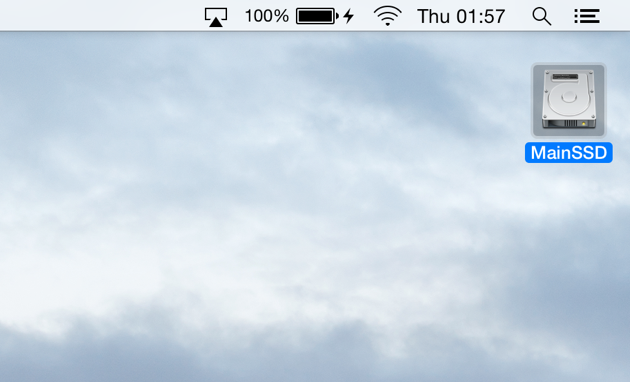
After selecting this box, your desktop should now show the hard disks on your mac, in the form of icon(s), like this:

Startup Disk Full | Displaying your hard disks

These are disks on your Mac Catalina OS that you can “startup”, this is because they have operating systems on them. If there is more than one of these hard disk icons that show up on your desktop, it means you’ve got multiple hard disks on your Mac. If you only have one, skip the down to “What is taking up all of my startup disk space?” section.

If you have more than one, continue with the next step:

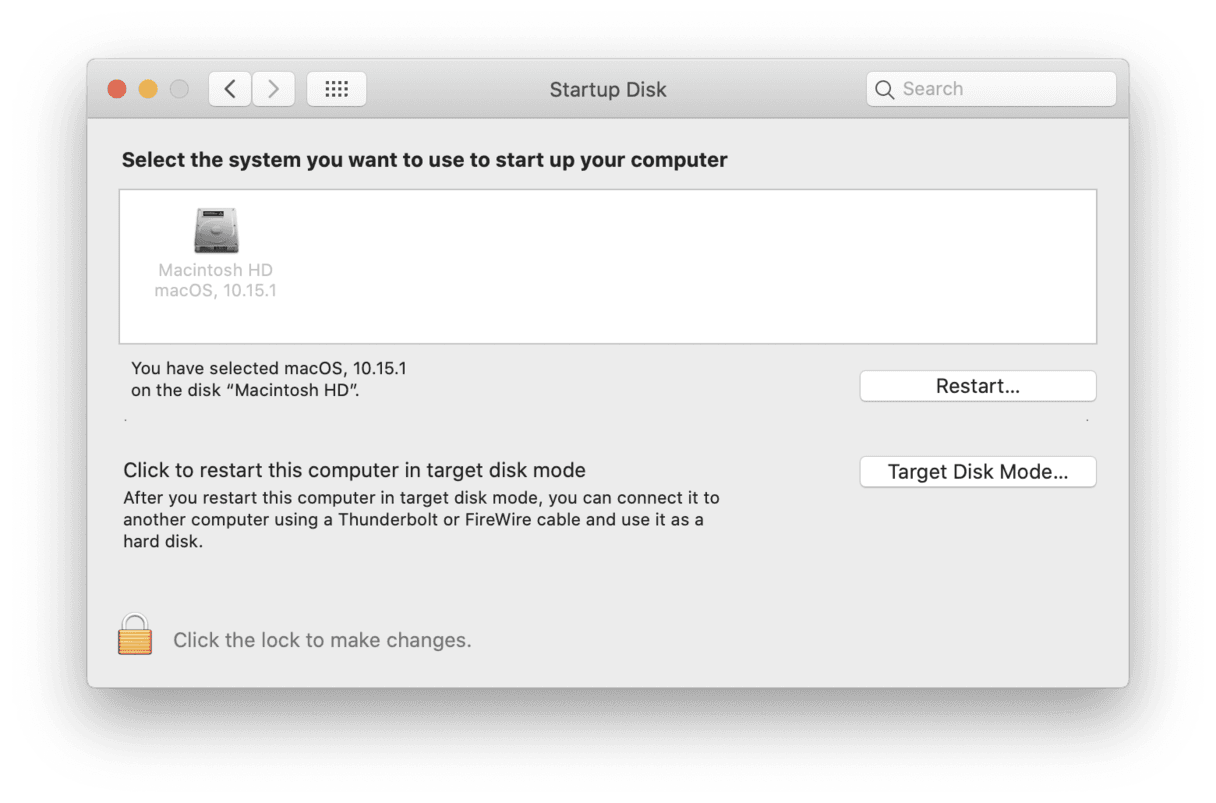
Click on the Apple icon at the top left of your screen System Preferences > Startup Disk.

Here, again, you’ll find your hard disk(s); they’re probably named something like MainSSD or MainHD. It will also display “OS” and the version number of that OS. If you have more than one OS drive, your startup disk should be the one with the latest version of macOS running on it, but we’re going to make sure of that in the next step.

I only have one and it looks like this:

Startup Disk Full | Select the system to start up Mac

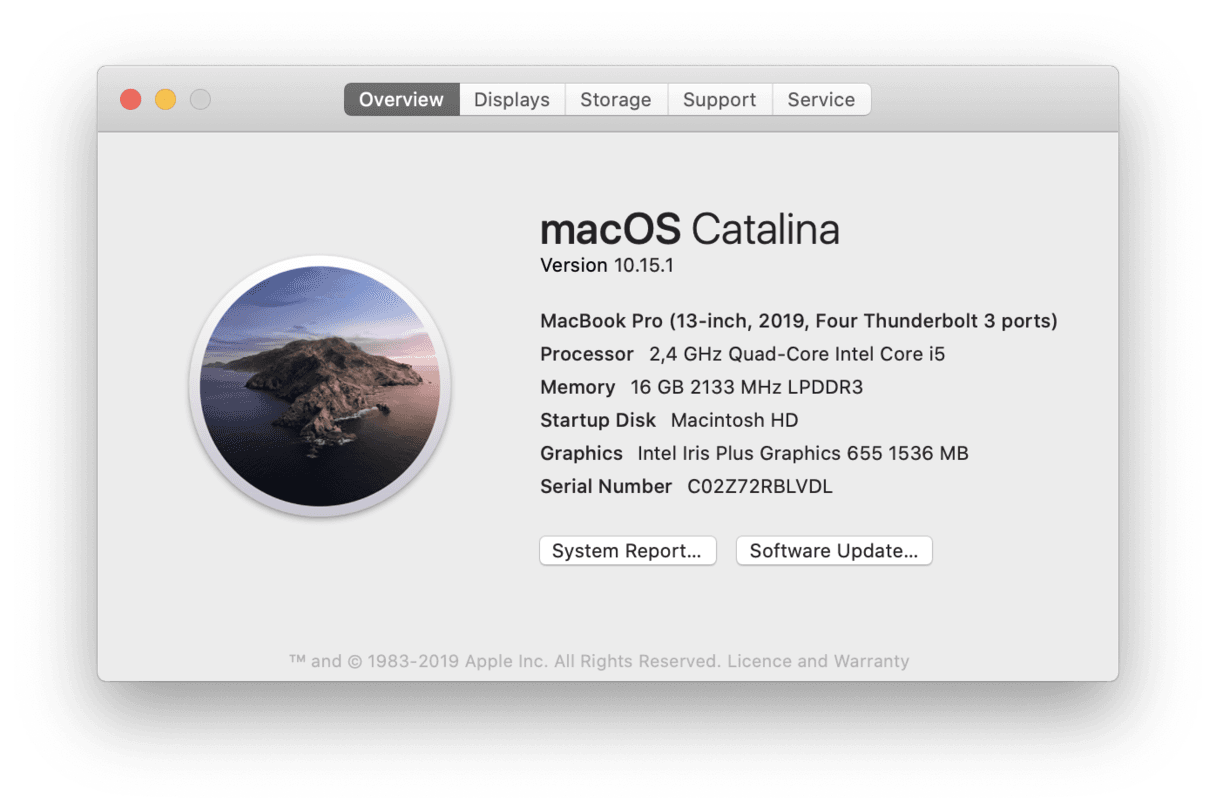
To make 100% sure that you know what drive is your startup disk, follow these steps:

  1. Click on the Apple Icon in the menu at the top-left of your screen.
  2. Select “About This Mac.”
  3. Under macOS, you’ll find a version number. Mine is 10.15.1, like so:

See how my version number in the “About This Mac” window matches the number in my Startup Disk section? Yep — That’s my startup disk. Found yours? Good.

What is taking up all of my startup disk space?

Now that we’ve identified our startup disk, let’s take a closer look at how to clear up space on Mac:

  1. Click the Apple Icon in the menu at the top-left corner of your screen.
  2. Choose “About This Mac.”
  3. Click Storage.
    Note: If you are running an older version of OS X Catalina OS you may have to first click “More Info…” and then “Storage”.

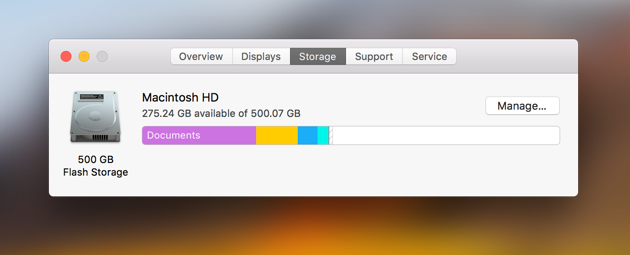
Take a look at my hard drive disk:

Startup Disk Full | Checking your disk storage

I’ve got 500GB of storage, and about 275GB of it is free space. 

So, how big is your hard disk? How much free space do you have (if any — *gulp*)? And what’s taking up the most space? It is important to consider drive capacity and data storage needs for future storage plans — we’re not just here to fix the problem, for now, we’re going to make sure you never have this problem in the future as well.

Now that we have the knowledge, it’s time to take action and fix your Mac’s “Startup Disk Full” problem.

MacOS Catalina Continuity issues: Could not import & Device Timed out

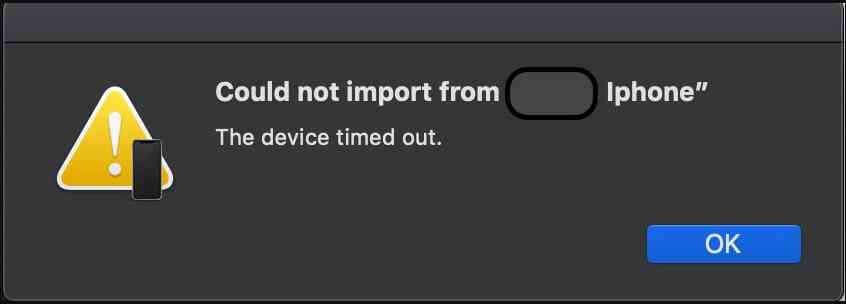
Fix “Could not import picture and iPhone device timeout”. How to fix continuity camera issue for scanning documents or import pictures from iPhone to Mac’s documents like pages, Notes, messages, mail and more. Of you, if you try to copy content from iPhone 6, iPhone 7, iPhone 8/plus, iPhone XR to MacBook Pro/Air.

We all like the continuity feature in mac it lets your work easier by transferring data from iPhone to Mac Catalina OS or vise-versa with ease using handoff feature. You can also import images from iPhone to notes, MS office or documents using continuity feature running on MacOs Catalina OS 10.15.

Continuity camera is One more feature now available on Mac and iOS after Auto unlock, Handoff, instant Handoff, SMS/MMS Messaging, iPhone Calls, Universal Clipboard.

Recently we have seen a lot of Apple users have a problem in using continuity features after update to MacOS Catalina. If you are facing the same issue in your MacBook running on Catalina and getting the same error as below while trying to take a photo from my iPhone to the notes app “could not import picture and iPhone device timeout”.

MacOS Catalina Continuity issues: Could not import & Device Timed out

How to Fix Continuity camera not working and stuck on import from iPhone in Catalina OS

Verify 1: Check Requirements below before start Continuity camera

  • Both Mac and iOS device have Wi-Fi and Bluetooth turned on
  • Make sure Mac and iOS devices are signed in to same Apple ID Account.
  • Mac is using MacOS Catalina and iOS is updated to iOS 12 or later.

Check 3: Re-create Bluetooth plist file on Mac

Go to Bluetooth file under preference folder on Mac.

Open Finder on Mac. Next, Go > Go to Folder > type “/Library/Preferences/” and Open.

MacOS Catalina Continuity issues: Could not import & Device Timed out

Find, com.apple.Bluetooth.plist file and Delete it.

MacOS Catalina Continuity issues: Could not import & Device Timed out

Now, Reboot your Mac to refresh Bluetooth settings.

MacOS Catalina Continuity issues: Could not import & Device Timed out

Check Bluetooth is turned on and Try to use camera and scan document continuity.

Above mention, solutions work 99% of the case. Hope it solves your Continuity camera issue in MacOS Catalina. You can also share your own solution that works for you in the comment section to help others.

Fix MacBook Overheating macOS Catalina after Update: Pro/Air

fix over heating issue in big sur

Are you facing heating problems in your Macbook after updating it to Catalina OS X. You come to the right place for this. We will present to you the best solution to fix this issue.! Read the full tutorial until the end. Not only MacBook’s face overheating issues there are other laptops too currently facing this dilemma. For you, There are many situations in which MacBook gets overheated such as “MacBook overheating while charging,” “MacBook when closed,” “MacBook overheating after updating” or “MacBook overheating on normal usage also” when updated to macOS Catalina 10.15 and more.

All these problems have there own solution that we tried to list them all in the following section. If you face this issue, then there are tremendous possibilities like some part of MacBook Air will damage or it may create a fault in ICs. So if you are the one who has overheating issues in MacBook then prefer the following troubleshoot and fix “MacBook Overheating issue in macOS Catalina.” In Catalina they removed support for 32 bits apps as well as the epic dashboard do you know you can get back dashboard data in Catalina OS easily.

If you face heating issue in normal usage also like only using for music or excel or just internet surfing on safari then see what you can do to fix MacBook Overheating problem all Time on MacOs Catalina 10.15

Fix 1: Reset SMC

This first step to do is resect SMC after updating to Catalina so that any old data should be removed from the cache.

  • Follow these steps for iMac, Mac mini, Mac Pro, and Xserve.
  • Choose Apple menu > Shut Down.
  • After your Mac shuts down, unplug the power cord.
  • Wait 15 seconds.
  • Plug the power cord back in.
  • Wait 5 seconds, then press the power button again to turn on your Mac.
  • For Intel-based Xserve computers that aren’t responding, you can shut down locally or by using remote commands. You can also press and hold the power button for 5 seconds.

Fix 2: PRAM/NVRAM on Catalina

Fix 2: PRAM/NVRAM on Catalina

This first step to do is resect PRAM/NVRAM after updating to Catalina so that any old data should be removed from the cache.

  • Shut down your Mac.
  • Turn it on and immediately press and hold these four keys together: Option, Command, P, and R.
  • You can release the keys after about 20 seconds, during which your Mac might appear to restart.
  • You will need a wired keyboard to perform this reset, and the keyboard must be an Apple keyboard.

Fix 3: Run MacBook Hardware Test

This feature is used to find out how the MacBook’s hardware is functioning. If any of the equipment is not working fine, then you will see the error.

  1. Detach all the peripherals and turn off the MacBook.
  2. Next, turn on the MacBook and press “D key” from the keyboard.
  3. You will see “Apple Diagnostic tool” or “Apple Hardware tool” on the screen.
  4. Now, your MacBook is underdiagnoses, and you will get outcomes soon on the same screen.
  5. There you will get some error code which will be helpful for you to fix MacBook overheating after updating to macOS Catalina.

Fix 4: Remove large apps which are consuming high resources

If your MacBook is overheating for no purpose, then it might be possible that large apps are producing load on the processors and so MacBook is overheating in macOS Catalina.

  1. Launch “Finder” and open “Applications” folder.
  2. Now, open “Utilities” folder.
  3. Locate and click on the “Activity Monitor” and start observing the applications.

When you force stop the applications from Activity Monitor, there are chances that after some time it will cause the same overheating issues in MacBook Pro. So it is advisable to remove the applications that are no longer needed or else re-install it.

Related Article: Should I Upgrade My mac to Catalina OS ? 10 Reasons you Should and 4 Reasons You Shouldn’t.

Fix 5: Use Energy Saver Settings

The Energy saver mode will stop the applications that are taking a lot of CPU resources without any requirement. This how the applications will not run in the background unless you open it and a lot of memory and processor will be saved. Hence MacBook overheating and freezing will be fixed.

  1. Click on the “Apple” menu and then open “System Preferences.
  2. Next, click on the “Energy Saver.
  3. Check the box near to “Automatic graphics switching.”

Fix 6: Clean the Fan

Is your MacBook is old? Haven’t you cleaned it yet? Now, it’s time to clean it. When you will open the Back of the MacBook and see the dust surrounds the parts of MacBook, you will be shocked. So it might be a reason why your MacBook is overheating for no reason after updating. The fans are running slow due to dust, and there are many more causes behind this. Clean the fans as soon as possible.so that proper air flow can be there inside your mac.

Fix 7: Remove Malware

No one knows when you are getting attacked by any virus it’s better to install a secure antivirus so that we will be tension free from virus attack that can also affect the performance of the MacBook Virus can come while surfing or downloading some file from the internet. They damage our system by hiding in some corner. To fix this, get a reliable anti-virus for your MacBook and clean your MacBook instantly.

Fix 8: Fall Back to an older version of Mac

After doing all these fixes if your mac is still heating in MacOs Catalina then you MacBook might be not supporting MacOS Catalina os 10.15 right now. Then you should downgrade macos from Catalina to Mohave.

Fix 9: Wait for an update of Catalina OS

If you are running your MacBook pro on latest Catalina OS os on any beta version then there might be the case Apple also know about the heating issue of Catalina OS so they might send an update to fix this issue for that you have to wait for an update to fix the heating issue in Catalina OS.

Fix 10: Contact Apple Support

If none of the solution works then there may be the possibility some hardware is damaged or creating the issue you should take your MacBook Pro to nearest Apple care center. Find the real reasons from apple support center nearby you.